This article explains how to get started with adding custom HTML, JavaScript, and CSS to further customization your customers' Storefront Shopping Experience in Pulse Commerce using WYSIWYG editors. It provides guidance on adding custom HTML, CSS, and JavaScript, using Visual Studio Code (VS Code) (or other editors) to prepare code safely, and best practices to follow before pasting raw HTML into your site.
Yes. You can use your own HTML, JavaScript, and embedded CSS tags inside Pulse Commerce WYSIWYG editors. This makes it possible to align storefront content with the look and behavior of an existing website (for example, custom banners, headers, layout blocks, and embedded widgets).
For merchants with advanced HTML skill sets, Pulse Commerce may provide HTML code examples. You may also use sample code found on the web or code you write yourself. See the “Before You Paste Example HTML Code” section in this article for requirements and risks.
Pulse Commerce includes built-in WYSIWYG and Source Code Editors that allow you to update most storefront content directly within the platform. For merchants or developers who prefer working in a full-featured code editor, a popular option is Visual Studio Code (VS Code).
VS Code is a free, cross-platform editor that supports HTML, CSS, JavaScript, extensions, syntax highlighting, auto-complete, and optional live preview tools—making it ideal for editing custom HTML before pasting it into Pulse Commerce.
Why use VS Code instead of Dreamweaver?
- Free and fully supported (Windows, macOS, Linux)
- Lightweight and faster than legacy editors
- Excellent HTML/CSS/JS editing features
- Optional add-ons for FTP/SFTP, live preview, version control, etc.
- No legacy Adobe dependencies
Step 1: Install Visual Studio Code
- Download VS Code from: https://code.visualstudio.com/
Step 2: Create or edit your HTML in VS Code
- Create a new HTML file in VS Code and add your custom content (for example: headers, banners, menus, or layout elements).
-
Use relative paths for images and links.
Example:<img src="/images/imagename.png">
Do not use absolute URLs (for example:https://www.yoursite.com/images/file.png) because they can cause SSL warnings or break when domains change. - When your content is ready, select the code you want to move into Pulse Commerce.
Step 3: Add your HTML into Pulse Commerce (Source Editor)
- In the Pulse Commerce Admin Panel, go to:
Content > Logo and Custom Header Editor
- Click the View/Edit Source tab to open the Source Editor.
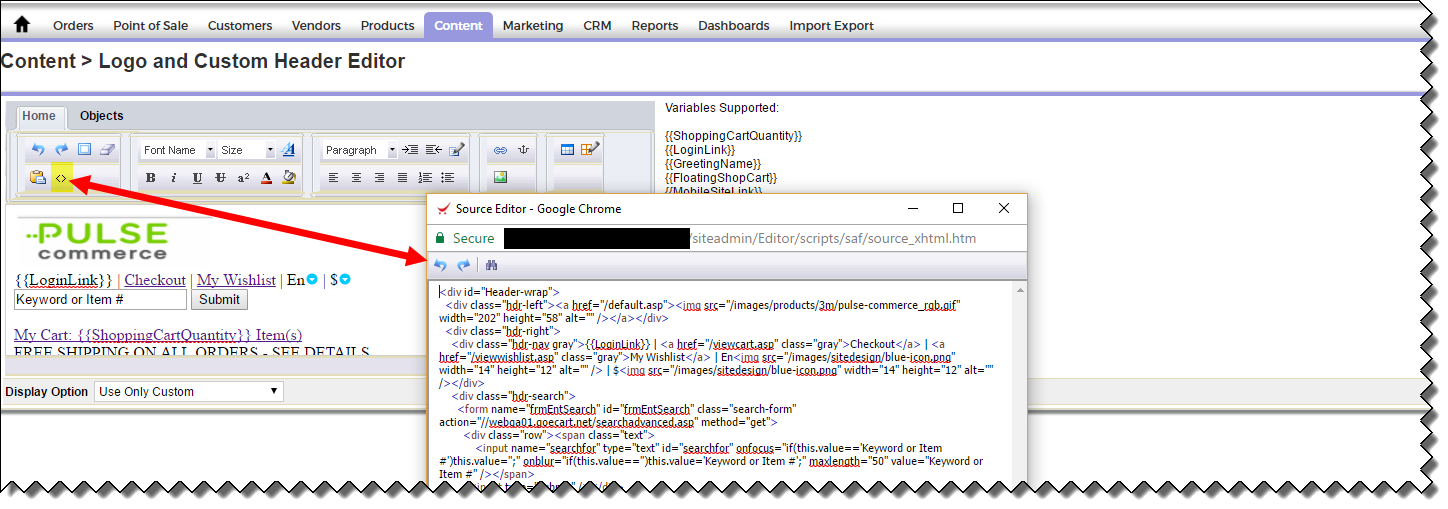
- Remove the old code by selecting and deleting it.
-
Paste your HTML code from VS Code into the now empty Source Editor window.
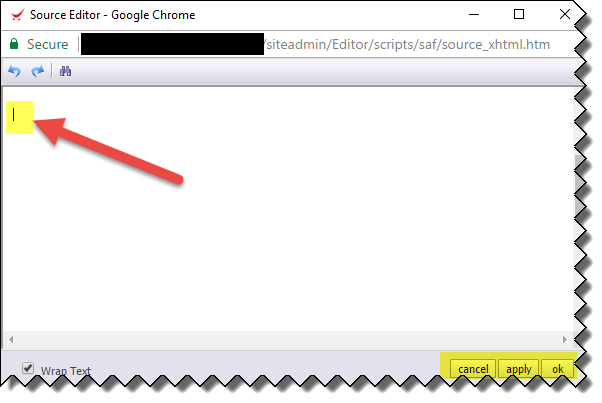
- When finished, click Apply and then OK.
- Click Update to save your changes.
Best practices
- Use relative paths for images and links.
- Validate your HTML using tools such as W3C Validator.
- Avoid inline scripts unless necessary—use HTML/CSS where possible.
- Test your HTML layout on staging site before applying to production.
- ALWAYS BACKUP - save and keep a local backup of the raw HTML code BEFORE your changes, and AFTER your changes.
Using VS Code provides a clean, modern workflow without requiring legacy software. If you need help, ensure someone familiar with HTML/CSS reviews updates before publishing them.
If you prefer third-party tools such as Adobe Dreamweaver, you can copy and paste the generated HTML into the applicable WYSIWYG editor windows in Pulse Commerce.
- Open Dreamweaver and create your custom header, inserting content, images, and links.
Important: Use relative paths for all images and links. Do not use your domain name in image/link URLs. If you use absolute paths, you may receive security errors after SSL is installed.
- When finished, go to Dreamweaver’s Code view and copy the HTML in between the
<body></body>tags. - In Pulse Commerce, go to Content > Logo and Custom Header Editor.
-
Click the View/Edit Source tab to open the Source Editor.
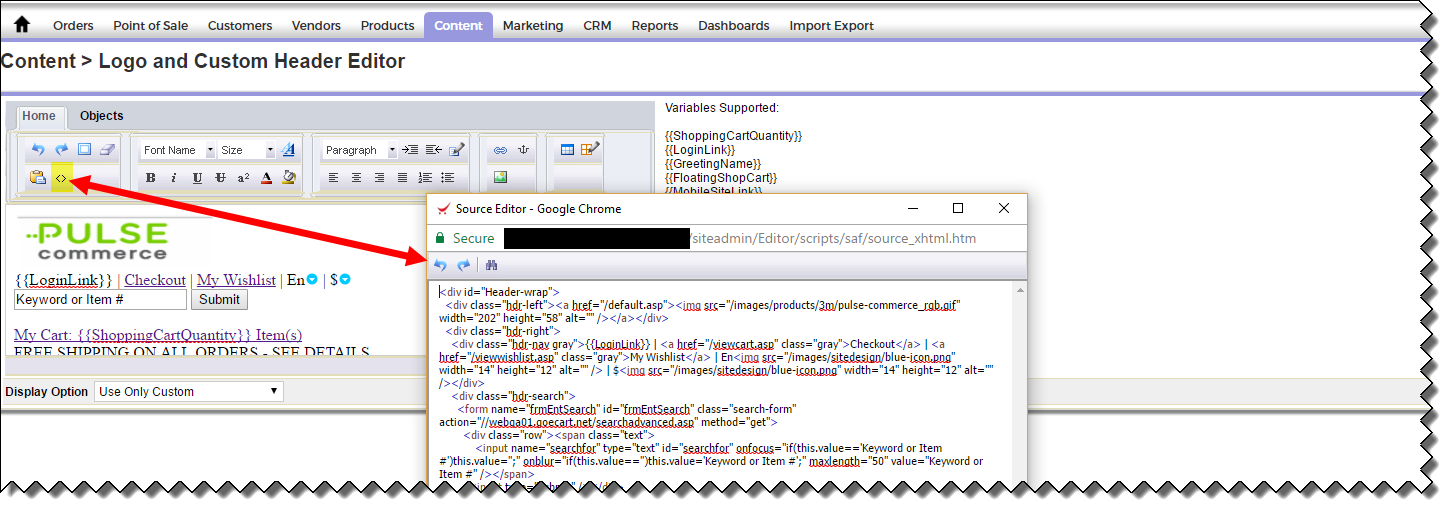
- To replace what is in the editor, select the existing code and delete it.
-
Paste the HTML copied from Dreamweaver into the now empty editor window.
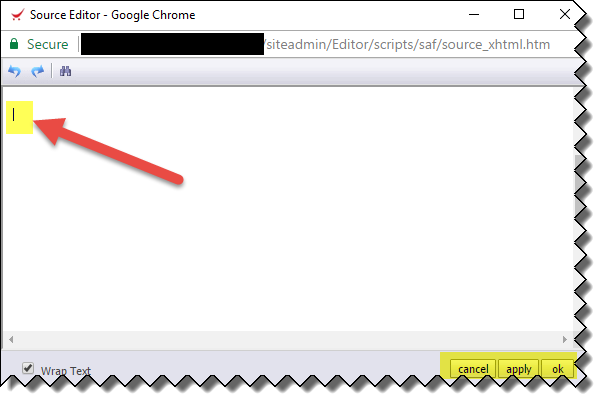
- When finished making changes, click Apply and then Ok.
- To save changes, click Update.
Pulse Commerce may provide example HTML code for merchants with advanced HTML skill sets. Some merchants may also find HTML sample code on the web or write their own HTML. When using any code examples, you may need to modify the HTML to work with your site.
Please be aware that future versions of Pulse Commerce may change or disable some of the functionality provided in code examples. In this event, you will be responsible for creating, removing, or updating your own HTML code and/or making changes to your site.
What this article covers
- Where custom HTML/CSS/JS can be used in Pulse Commerce WYSIWYG editors
- Recommended workflow using VS Code (and optional Dreamweaver workflow)
- How to paste code into the Source Editor for the Logo and Custom Header Editor
- Best practices and risks of using example HTML code