This article explains the Left Navigation editor (Links and Link Groups), the Left Navigation header labels (Navigation Layout), and the primary ways Top Navigation content is displayed and managed in Pulse Commerce. It consolidates the workflows for adding links, organizing link groups, controlling visibility, and enabling top navigation display behaviors for customers.
- Left Navigation: The left-side storefront panel that can display categories and a Links area with merchant-defined links, organized into Link Groups.
- Left Navigation headers: The header labels/images shown above left-nav sections (for example, “Shop by Category”). These are managed under Settings > Navigation Layout.
- Top Navigation: The set of navigation elements at the top of the storefront, which may include: header content (logo/banner), top-panel promotional content, and category-driven dropdown navigation.
Pulse Commerce enables adding, editing, deleting, and sequencing left-navigation links through the Links and Link Groups page (no HTML required). Links are displayed under a selected Link Group.
Add a new link
- Hover over Content in the main menu.
- Click Links and Link Groups.
- Complete the Add New Link form.
- Click Add New.

Link field definitions
- Link Name: Text displayed to customers in the left panel.
- URL: Destination for the link (relative or absolute).
- Link Group: The section header the link appears under.
- Visible: Controls whether the link appears on storefront.
- Popup: Opens the destination in a popup window when clicked.
Edit an existing link
- Update the desired fields for the existing link.
- Click Update.

Change display order of links
- Use the move controls below the existing links table to position one link before/after another.
- Click Move.


Link Groups are left-navigation section headers. Links assigned to a Link Group display under that group name. Create Link Groups first, then assign links to them.
Create a new Link Group
- Go to Content > Links and Link Groups.
- Click the Link Groups tab.
- Under Add New Link Group, enter a Link Group Name and default URL (relative or absolute), then click Add New.

- To add links to the group you created, return to the Links tab and select that Link Group when creating each link.
Update a Link Group name
- Type the new name in the Link Groups table.
- Click Update.

Delete a Link Group
- Click Delete next to the Link Group.

You can replace default left-navigation header images with your own images, or choose to display text instead of an image (for example, “Shop by Category”).
- Go to Settings > Navigation Layout.
- In the table at the top, enter the path for a new custom image in the Image field or click Browse to select an image.

Note: To display text instead of an image, delete the full image path from the Image field. - Repeat for each header image you want to customize.
- Click Update.
Pulse Commerce provides multiple ways to display top navigation content and options to customers. These can include header/banner content and category-based dropdown navigation behaviors.
Option A: Logo and Custom Header Editor (top-of-page header content)
The Logo and Custom Header Editor is used to enter ads and set the banner at the top of every page. Enable/manage it under Content Management >> Logo and Custom Header Editor.
Option B: Top Panel Widget (banner below the top header menu bar, all pages)
The Top Panel can promote a banner displayed below the top header menu bar links and on all pages.
- Go to Content Manager > Widget Manager > Right / Top Panel.
- Click the Top Panel link.
- Click Edit to open the Top Panel Socket Editor.
- Add content and click Update.
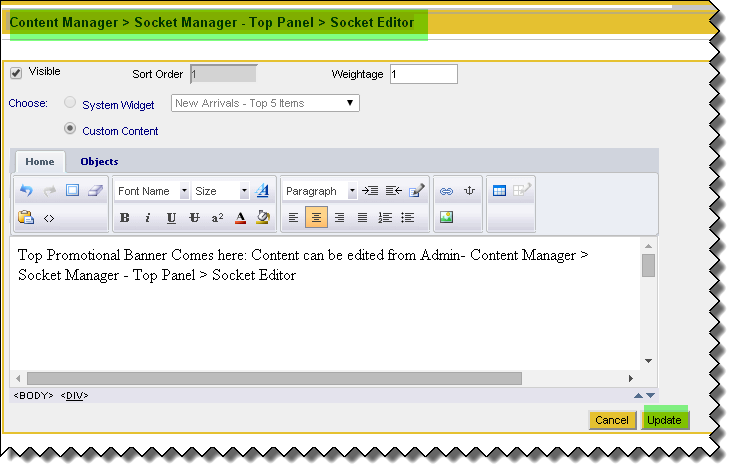
Storefront display examples:
Option C: Top Navigation Bar display behavior (site setting)
Pulse Commerce supports display values controlling the Top Navigation Bar. Configure under: Site Settings > General Settings > Display Settings > Display Top Top Links (About Us, Shopping Cart...).
Option D: Top-Down Category Navigation dropdown (category-based)
The Top-Down Category Navigation menu is driven by category hierarchy and settings. You can configure the number of levels displayed and enable visibility in Navigation Layout.
- Go to Products > Category Editor.
- For Rebuild Top Down Category Navigation, select the number of subcategory levels to display (maximum 4 levels, including the top level).


Enable visibility for Top-Down Category Navigation
- Go to Site Settings > Navigation Layout.
- For Top Down Category Navigation, select Visible.
- Click Update.

Storefront example:
In addition to the left-navigation Links area, you can add links using other content tools:
-
Home Page Editor: Content Manager > Home Page Editor → Edit a message → Use the Hyperlink icon to insert a link into home page areas.
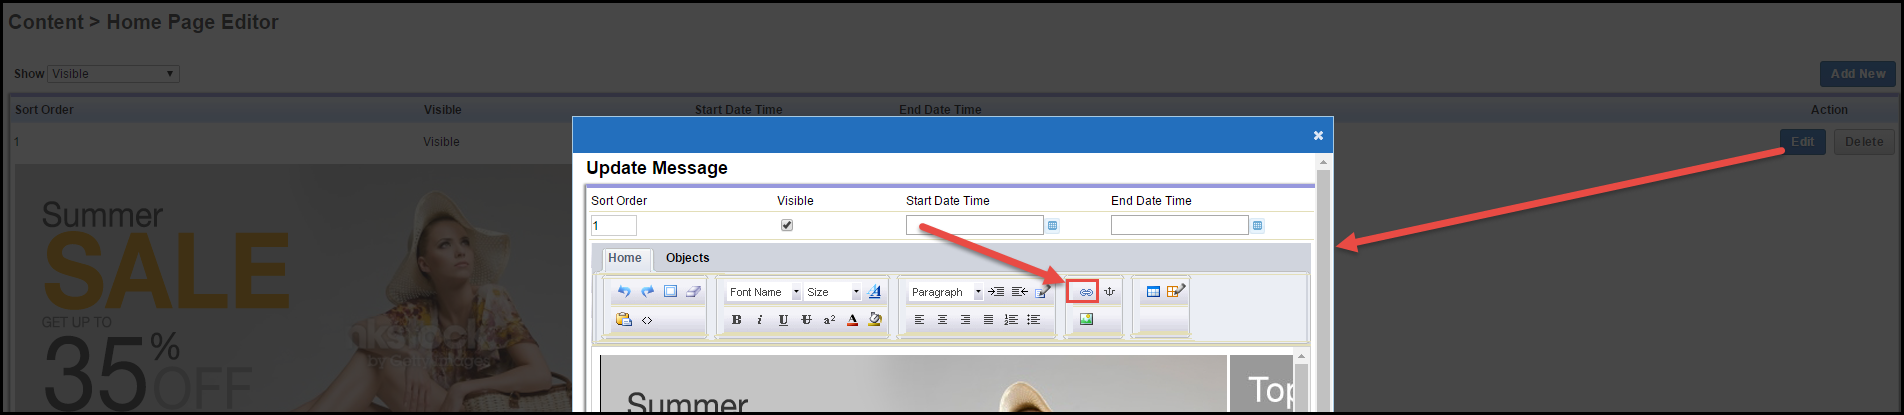
- Left navigation Links section: Add links through Content > Links and Link Groups (described above).
- Sockets/Widgets: You can add links to one or more sockets displayed on the site via Content Manager > Socket Manager.
