How do you optimize, upload, and troubleshoot product images in Pulse Commerce? This article consolidates best practices for thumbnail, medium, and large images, mobile sizing recommendations, supported file formats (including PNG and animated media), a bulk image optimization workflow using Easy Thumbnails, and step-by-step troubleshooting for broken or missing images (the “X” placeholder).
This guide is organized around the most common image-related tasks:
- Choose the right sizes for thumbnail, medium, and high-resolution (zoom) images.
- Optimize for mobile using a practical width baseline and responsive CSS.
- Confirm supported formats (JPG/JPEG, PNG, GIF, WebP, plus supported animation types).
- Bulk create web-optimized images using a batch tool (Easy Thumbnails).
- Troubleshoot broken images when you see an “X” placeholder on the storefront.
Pulse Commerce uses three different image sizes—thumbnail, medium, and high resolution (zoom)—and each serves a specific purpose. Uploading images in the correct size and file weight improves page load times and preserves a high-quality experience on product pages.
Understanding the Three Image Types
- Thumbnail: A very small preview image, commonly used in product lists and category pages.
- Medium: Used on product pages to provide a clear standard view of the product.
- High Resolution (Zoom): Used for zooming to view fine product details. High-resolution images should not be used for thumbnails.
Recommended Sizes
| Image Type | Recommended Horizontal Resolution (pixels) | Recommended Size (kilobytes) |
| Thumbnail | 50 to 150 | 1 to 35 KB |
| Medium Resolution | 200 to 400 | 30 to 100 KB |
| High Resolution (Zoom) | 450 and up | 100 KB and up |
A practical web-standard for mobile images is 480 pixels wide. Images of this size will be visible across mobile devices in portrait mode. Higher-resolution devices (such as some iPhones and Android phones) can display larger widths, but 480px is a reliable baseline for performance and compatibility.
Recommended Responsive CSS (Optional)
If your storefront theme supports responsive behavior, the following CSS helps prevent images from overflowing their containers:
img { max-width: 100%; height: auto; }
You can also use @media queries to apply device-specific styling. Example patterns:
/* Smartphones (portrait) ----------- */
@media only screen and (min-device-width: 320px) and (max-device-width: 480px) {
  /* Styles */
}

/* Smartphones (landscape) ----------- */
@media only screen and (min-width: 481px) {
  /* Styles */
}

/* Tablets (portrait and landscape) ----------- */
@media only screen and (min-device-width: 768px) and (max-device-width: 1024px) {
  /* Styles */
}
Pulse Commerce supports all popular web graphic file formats: GIF, JPG, JPEG, PNG, WebP.
Format Guidance
- JPG/JPEG: Best for product photography; typically smallest file sizes for photos.
- PNG: Best for transparency (logos, icons) and sharp edges; can be larger than JPEG.
- WebP: Often smaller than JPEG/PNG at similar quality; supports transparency.
- GIF: Common for simple animations; can be larger than WebP for animation.
Pulse Commerce supports modern web-safe animated formats such as animated GIFs and animated WebP. These formats can be used in banners, homepage content, and custom pages to add lightweight motion or highlight key areas of the storefront.
.swf) is not supported. All major browsers removed Flash support in 2021, and Flash files will not play on any storefront.Supported Animation Formats
- GIF — best for simple, lightweight looping animations
- Animated WebP — smoother animation with smaller file sizes than GIF
How to Add an Animated Image to Your Storefront
- Go to the Content area in the Pulse Commerce Admin.
- Open the Home Page Editor (or another WYSIWYG editor location).
- Place your cursor where you want the animation to appear.
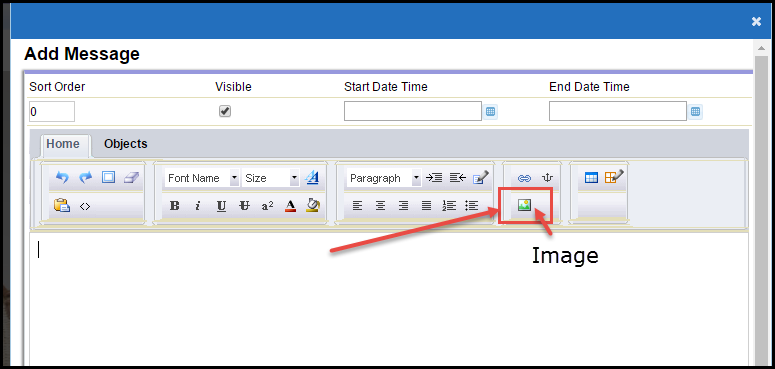
- Click the Image icon in the editor toolbar.
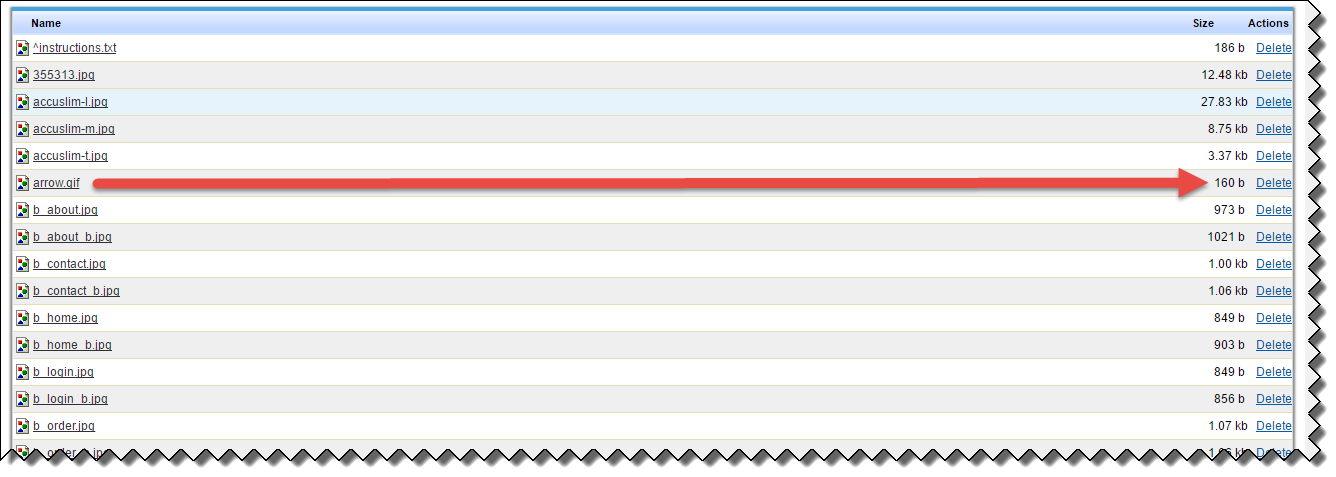
- In the Image Manager, upload or select your GIF/WebP and click Select.
- Confirm the animation appears in the editor preview.

- Click Update to save.

Best Practices for Animated Media
- Compress animations and keep them under 1 MB when possible.
- Prefer WebP over GIF for smaller size and smoother results.
- Avoid high-frame-rate, oversized animations that can slow down page loads.
- Do not upload Flash files; they will not display.
- Use animations sparingly to support key messaging without distracting from conversions.
Easy Thumbnails is a free application that has been recommended by merchants for batch/bulk image resizing, quality adjustment, and renaming. The program can be downloaded from: http://www.fookes.com/easy-thumbnails.
Workflow: Batch Resize and Optimize
|
Step Group A: Select Inputs and Settings 1) Select the folder that contains the images that need to be re-sized. 2) (Optional) Use this feature to list only a certain file format. 3) Select an image that needs to be re-sized. 4) Click this button to select the new image destination. 5) Click here to see more settings. |
|
Step Group B: Preview and Configure Output 6) Click the Preview output tab to see what the final image will look like. 7) Review final image resolution and file size (1024 bytes = 1 kilobyte). 8) Set the desired resolution (the program retains proportions and uses the larger dimension). 9) Type in the prefix or suffix of the output file name. 10) (Optional) Adjust output image quality (lower quality = smaller file size).
|
|
Step Group C: Convert 11a) Use this button to convert all images in the selected folder. 11b) Use this button to convert only the image selected. 12) This button will close the program.
|


Seeing an “X” icon or broken image placeholder on your storefront means the browser could not load the image. This typically occurs when the file cannot be found, cannot be accessed, or is blocked due to security or mixed-content rules.
http:// links on an https:// storefront.Common Reasons Images Fail to Load
- Incorrect or invalid image path (most common)
- The image file is missing or was not uploaded correctly
-
Mixed-content blocking — using
http://images on anhttps://storefront - Incorrect file naming (wrong extension, wrong case, or spaces)
- Corrupted or zero-byte image file
- Browser caching a previously removed image
1) Incorrect Image Path
If the image path is wrong, the file cannot be found and the browser displays a broken image placeholder. Ensure the image is located in the correct folder and that your HTML references the right location.
Correct relative path examples:
images/products/product123.jpgimages/products/thumbnails/shirt-thumb.pngimages/homepage/banner1.webp
Tip: File paths are case-sensitive on many hosting environments. Product123.JPG is not the same as product123.jpg.
2) Missing or Incorrectly Uploaded Image
Even if the path looks correct, the physical file may not exist on the server. This can happen if the image was never uploaded, the upload failed, or the file was deleted/overwritten.
How to verify:
- Open Content → Image Manager (or your file upload tool).
- Browse to the expected directory (e.g.,
images/products). - Confirm the image exists and the file name matches exactly.
3) Mixed-Content Blocking (HTTP vs HTTPS)
If your storefront uses HTTPS and an image is referenced using http://, modern browsers may block the image for security reasons.
Incorrect:
<img src="http://www.example.com/images/products/shirt.jpg">
Correct:
<img src="images/products/shirt.jpg">
or
<img src="https://www.example.com/images/products/shirt.jpg">
https:// URLs. Never use http:// links on a secure storefront.4) Corrupted Image File
If the image file is damaged, incomplete, or saved in an unsupported way, it may fail to load.
How to test:
- Download the image from your server or locate the original file locally.
- Open it using a modern image viewer (Preview, Photos, or a browser).
- If it won’t open, re-export/resave the image and upload again.
5) Incorrect File Naming
File names must match exactly. Common issues that cause broken images include:
- Spaces in file names (e.g.,
my image.jpg) - Case mismatches (
photo.JPGvsphoto.jpg) - Special characters (
# % & ?) - Wrong file extension (
.jpegvs.jpg)
Recommendation: Use clean, lowercase file names such as product123-large.jpg or product123-thumb.webp.
Summary Checklist
- Confirm the image exists in the expected folder.
- Confirm the file name and extension match exactly (including case).
- Use relative paths or
https://URLs (neverhttp://). - Confirm the image is not corrupted (opens locally).
- Clear cache / purge CDN if the image was recently replaced.
Use this end-to-end workflow to standardize your product image process and reduce storefront issues:
- Export/source images from your photography or design team in a consistent master size.
- Generate three variants (thumbnail, medium, high-res/zoom) using the recommended size ranges.
- Compress images to target file sizes (especially thumbnails and medium images).
- Use supported formats (JPG/JPEG for most photos; PNG for transparency; WebP where appropriate).
- Upload images and validate that file names and paths match your storefront references.
- Test storefront pages (category/product pages on desktop and mobile).
- If you see an “X” placeholder, follow the troubleshooting section: Path → File existence → HTTPS rules → File integrity → Naming → Cache.