How can you control category page layout, sorting, access, and brand-based shopping in Pulse Commerce? This guide consolidates the key category merchandising tools—Category Display Format 4 branding, default category sorting rules, member access limitations (password protection and customer groups), and “Shop by Manufacturer” (brand navigation).
Category merchandising and navigation in Pulse Commerce is managed across a few primary admin areas:
| Feature | Where to Configure | What It Controls |
| Category Page Branding (Format 4) | Products > Category Editor | Category-specific header/logo, optional left navigation, optional open-in-new-window behavior. |
| Default Category Sorting | Settings > General Settings | Default category page product order using primary and secondary sort keys. |
| Category/Product Access Controls | Add-on Modules (Password Protection / Customer Groups) | Member-only viewing and group-based product visibility (with important limitations). |
| Shop by Brand (Manufacturer) | Site Settings > Navigation Layout and Products > Manufacturer Editor | Brand/manufacturer navigation and product brand assignment. |
Category Display Format 4 enables merchants to display a different header section or brand for specific category pages and for the product pages accessed through those categories. This allows you to “brand” categories with a customized logo/page-header, and optionally open the category in a new browser window.
Enable Category Display Format 4
- Go to Products > Category Editor.
- Click Edit beside the category you want to update.
- Scroll to the Display Category Format section and select Format 4. When selected, the Top of Page Editor For Format 4 appears, allowing you to enter a custom page-header/logo.
- (Optional) Check Display in new window if you want the category to open in a new window.
- (Optional) Check Display Left Navigation if you want left navigation visible.


Supported Variables in the Format 4 Header Editor
The Top of Page Custom Header Editor supports the following variables:
-
{{GlobalHeaderContent}}– Use the global header -
{{GlobalHeaderWithTopDownCat}}– Use the global header with Top-down category navigation

Products are shown on category pages based on default sorting criteria configured under: Settings > General Settings > Results Sorting: Primary Sort Key and Results Sorting: Secondary Sort Key.

Available sort options (default settings):
- Alphabetically – Sort from A to Z
- Price – lowest to highest
- Sort Code – lowest to highest
Pulse Commerce applies the Primary Sort Key first, and then uses the Secondary Sort Key as a tie-breaker when products have the same primary value.
Where Sort Code Is Defined
Sort Code is specified per product for each category under: Products > Product Catalog Manager > Product Editor > Categories.

You can also update category sort values in bulk via Import/Export.
Pulse Commerce supports access restriction via add-on modules, but it is important to understand the difference between member-only access and customer-group product visibility.
What Is Possible
- Using the Password Protection add-on module, the site can be configured so only members can see categories.
- Using the Customer Group add-on module, you can configure visibility so certain customer groups can see certain products.
What Is Not Possible
If you need segmentation, the recommended approach is typically:
- Use Password Protection for member-only browsing
- Use Customer Groups for controlling product visibility and pricing logic by group
Customers can shop by brand in Pulse Commerce by enabling Shop By Manufacturer and assigning products to manufacturers (brands). This creates manufacturer-based navigation, commonly displayed in the left navigation menu.
Step 1: Enable Shop By Manufacturer in Navigation
- Go to Site Settings > Navigation Layout.
- Select Visible for Shop By Manufacturer.
- Add a Label for the feature (or)
- Add an image path in the Image field (if entered, it replaces the label text).

Shop By Manufacturer will now be enabled for the left navigation menu.
Step 2: Add Manufacturers (Brands)
- Go to Products > Manufacturer Editor.
- Click Add New Manufacturer.

- Enter the Name of the Manufacturer.
- Select Show Mfg. Label to make the label visible.
- Enter a Short Description for the Manufacturer display page.
- Enter a Page Title (browser title bar).
- Enter Meta Tags to describe page content for SEO.
- Click Add New to add the brand.


Step 3: Assign a Brand (Manufacturer) to a Product
- Go to Products > Inventory Manager.
- Click Edit beside the product you want to update.
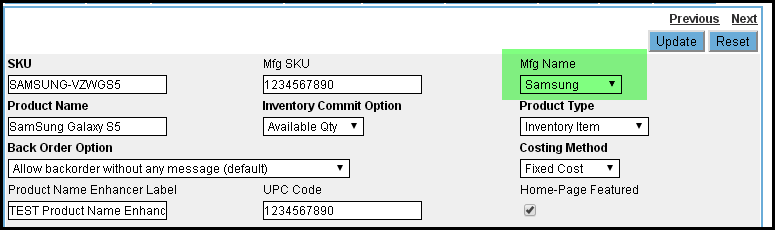
- In the Simple tab, specify MFG SKU and MFG Name. Select the manufacturer (brand) from the drop-down.
- Click Update to save changes.
Storefront Result
Customers can now browse products by manufacturer/brand.

Use this settings-driven workflow to implement category merchandising with minimal manual content work:
- Brand categories (optional): In Products > Category Editor, enable Display Category Format 4 and add the category-specific header/logo.
- Set default category sorting: In Settings > General Settings, select Primary and Secondary Results Sorting keys.
- Apply Sort Codes (optional): Set per-category sort codes in Product Editor > Categories or update in bulk via Import/Export.
- Configure access controls (if needed): Use Password Protection for member-only visibility, and/or Customer Groups to restrict product visibility by group (with the category-level limitations noted above).
- Enable brand navigation (optional): Turn on Shop By Manufacturer in Site Settings > Navigation Layout, then create manufacturers and assign them to products.
- Validate storefront behavior: Test at least one category per configuration type (Format 4 category, standard category, manufacturer page, restricted access behavior, and sorting behavior).